I finally stopped fighting the tiny space above the toilet. It’s a dumb little spot that can either look awkward or feel useful. Once I treated it like real storage, the whole bathroom calmed.
These ideas are things I’ve tried, returned, or kept. Practical, simple, and ready to buy.
22 Creative Over The Toilet Storage Ideas To Save Every Inch
If you want usable storage that looks intentional, you’re in the right place. These 22 ideas cover built-ins, thrifted fixes, and quick buys you can install in an afternoon. I tested them in real bathrooms — not showrooms — so you’ll get honest wins and a few of my learning moments.
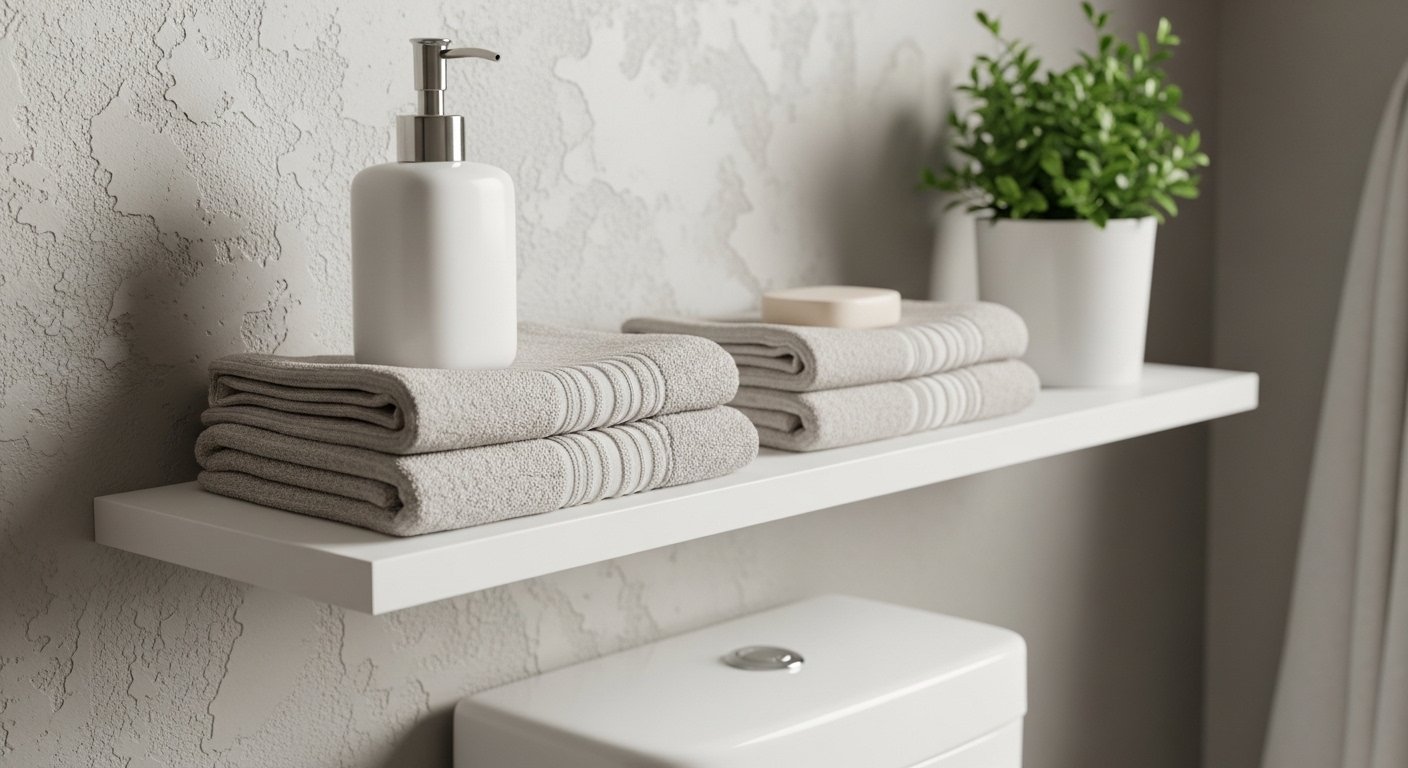
1. Slim Floating Shelf for Everyday Essentials
I put a single slim floating shelf above the toilet in my first apartment. It was the easiest change that actually worked. The shelf holds toothpaste, a spare roll, and a tiny plant. Visually, it gives the wall purpose without feeling crowded.
My mistake was choosing a shelf too shallow at first — things slid off. I learned to pick one with a 6–8” depth. Install it at eye level so it looks deliberate.
What You’ll Need for This Look
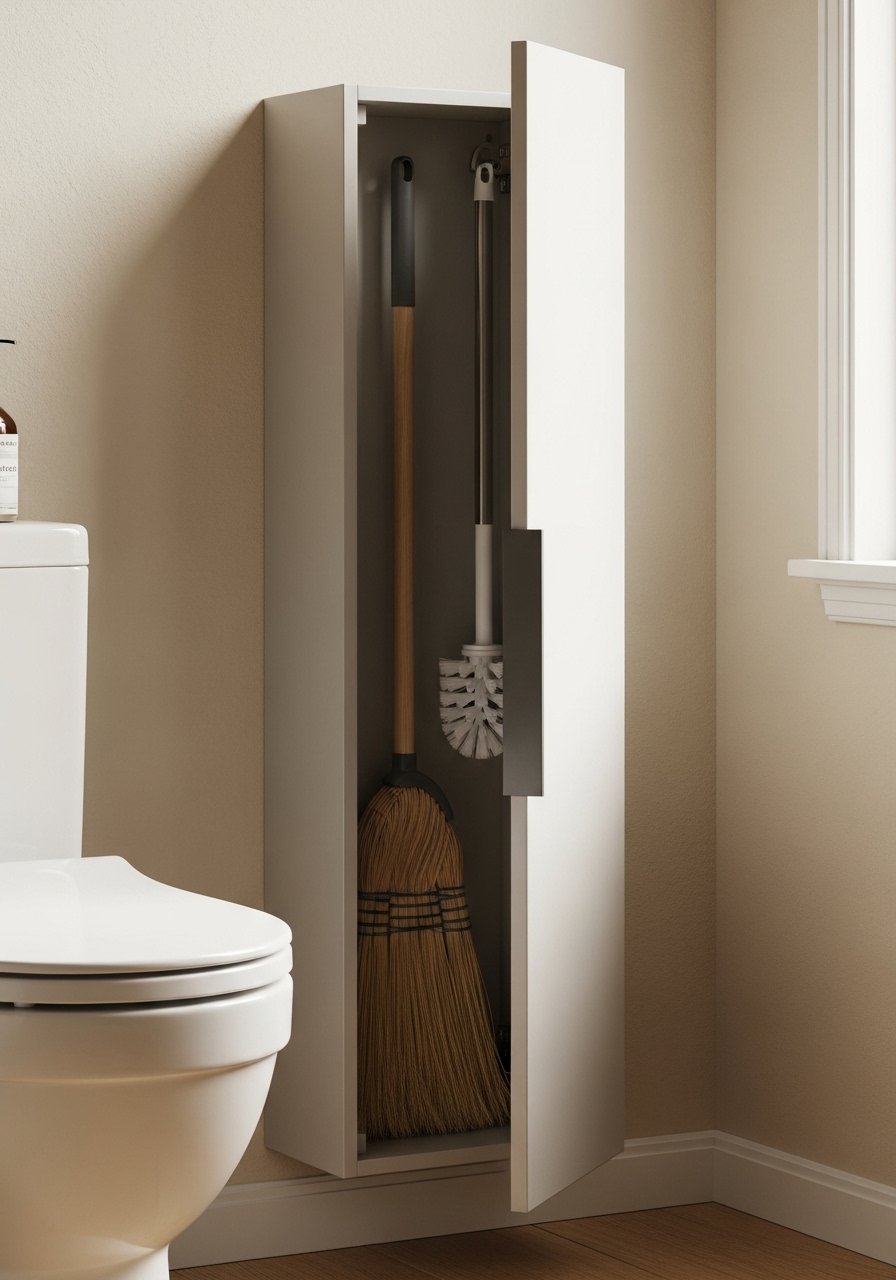
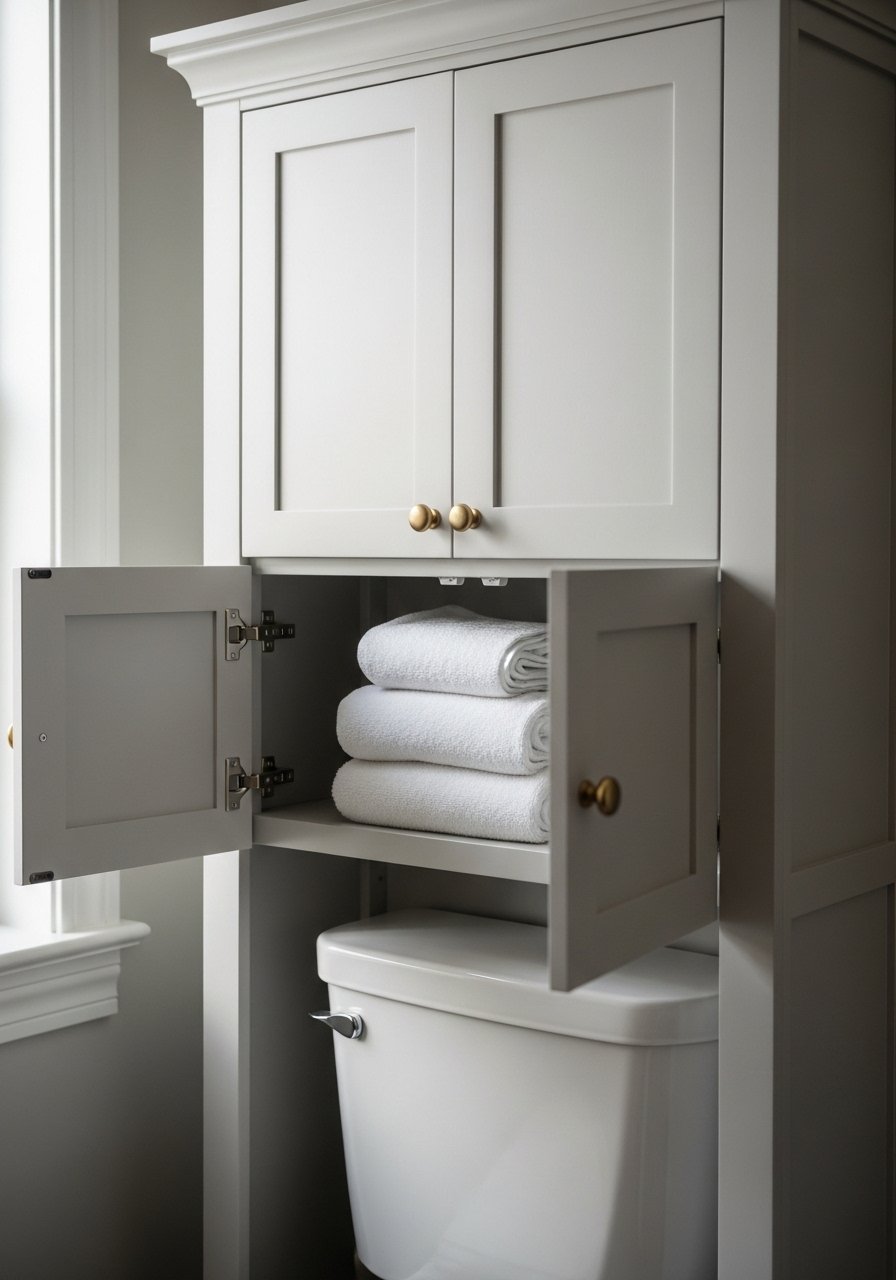
2. Over-the-Toilet Cabinet That Hides Clutter
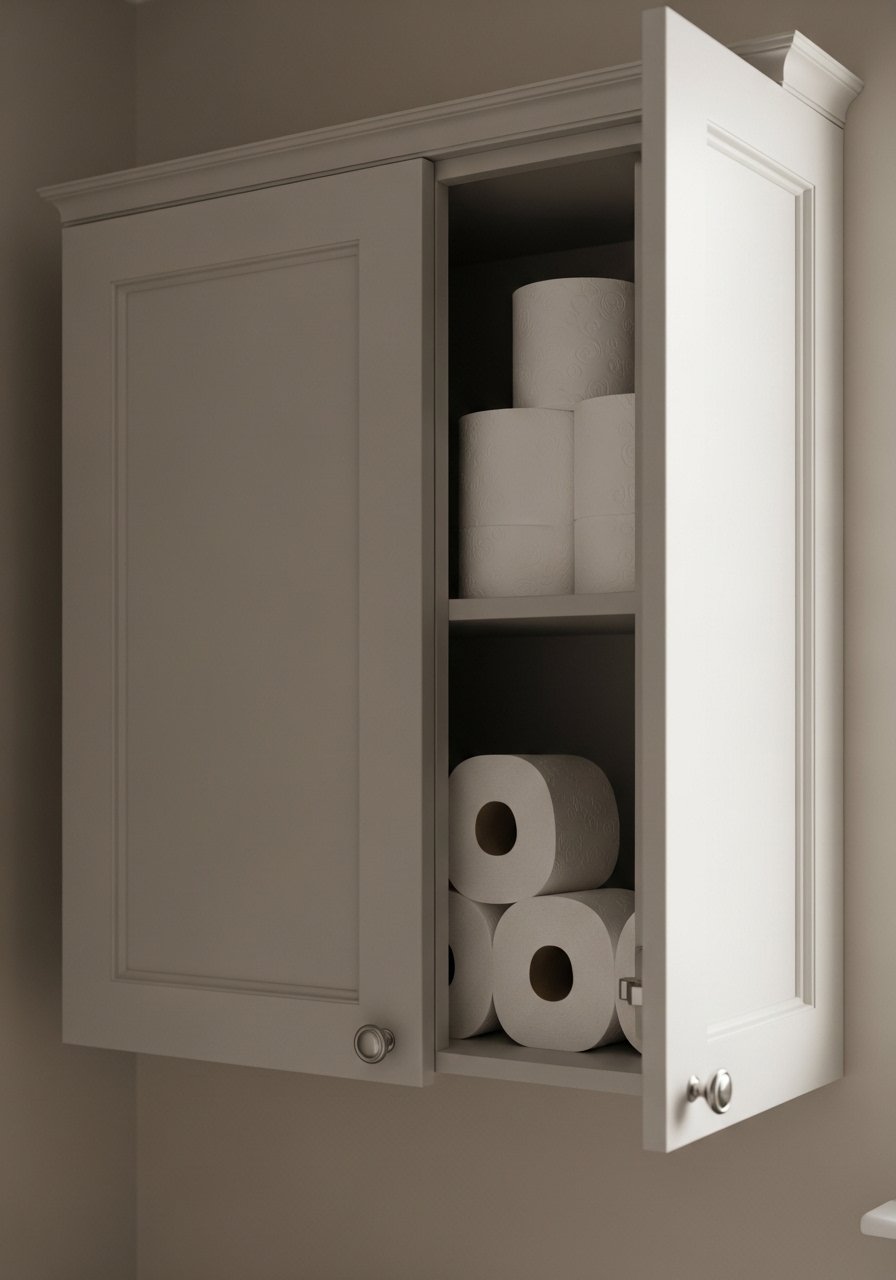
I needed hidden storage for cleaning supplies and extra rolls. An over-the-toilet cabinet made the space feel tidy overnight. Closed doors hide the mess and keep things smelling fresher.
I once bought a flimsy cabinet and the doors warped. Spend a little more for solid hardware. Mount it into studs or use heavy anchors. It makes a huge difference.
What You’ll Need for This Look
3. Ladder Shelf Leaning Behind the Toilet
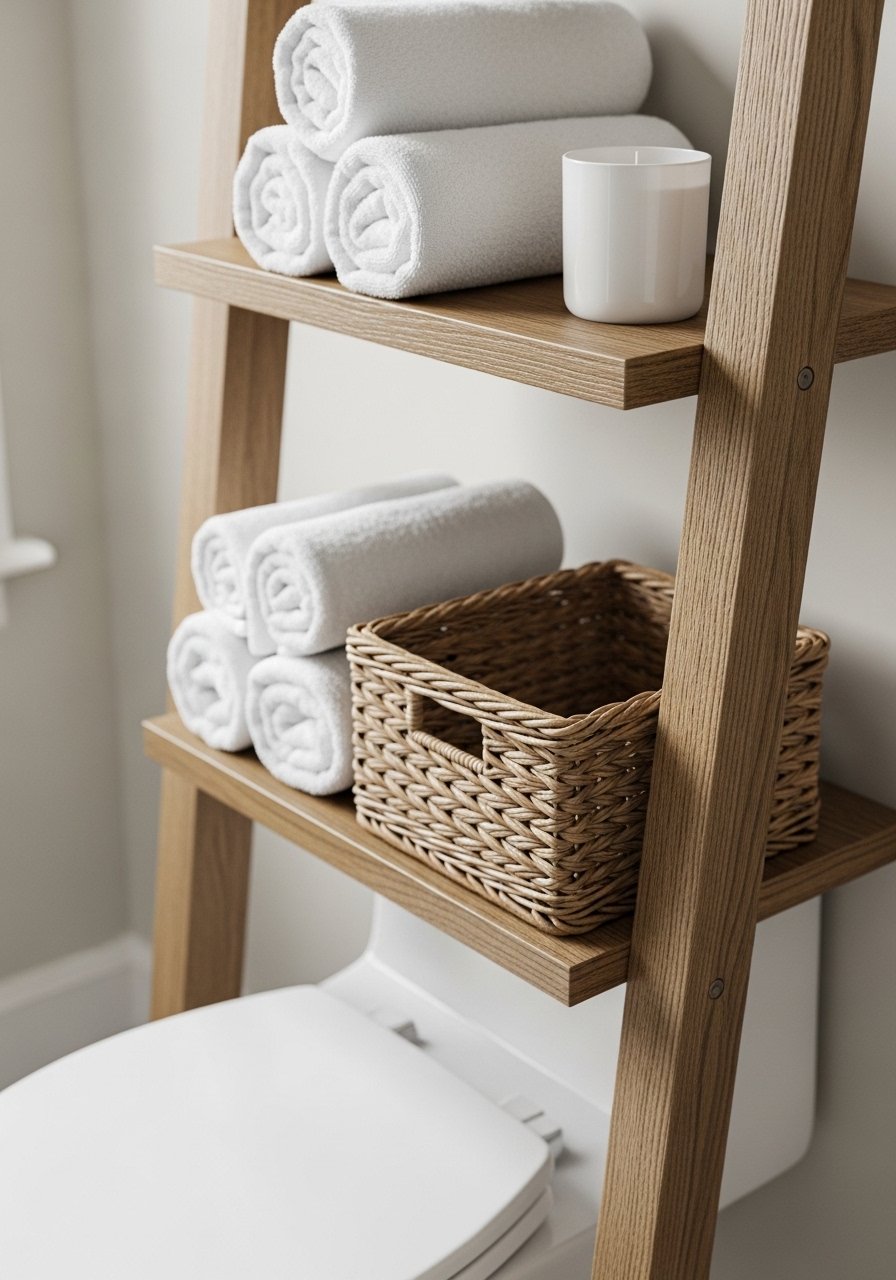
I fell in love with a leaning ladder shelf because it’s flexible and easy to move. I use the top for art and the lower rungs for towels and a basket of toiletries. It feels casual and layered.
The trick is depth. Pick a ladder with a slim profile so it doesn’t hit the toilet tank. I once had one that overhung and it looked sloppy. Position it slightly angled for a lived-in feel.
What You’ll Need for This Look
4. Narrow Slim Cabinet for Tall Items
Our tiny bathroom needed a place for the brush, cleaner, and extra bottles. A narrow slim cabinet fits beside the toilet and tucks those taller items out of sight. It keeps the floor clear and looks intentional.
I learned to choose one with an internal shelf so bottles don’t topple. Also, soft-close doors save the startling midnight slam I hated.
What You’ll Need for This Look
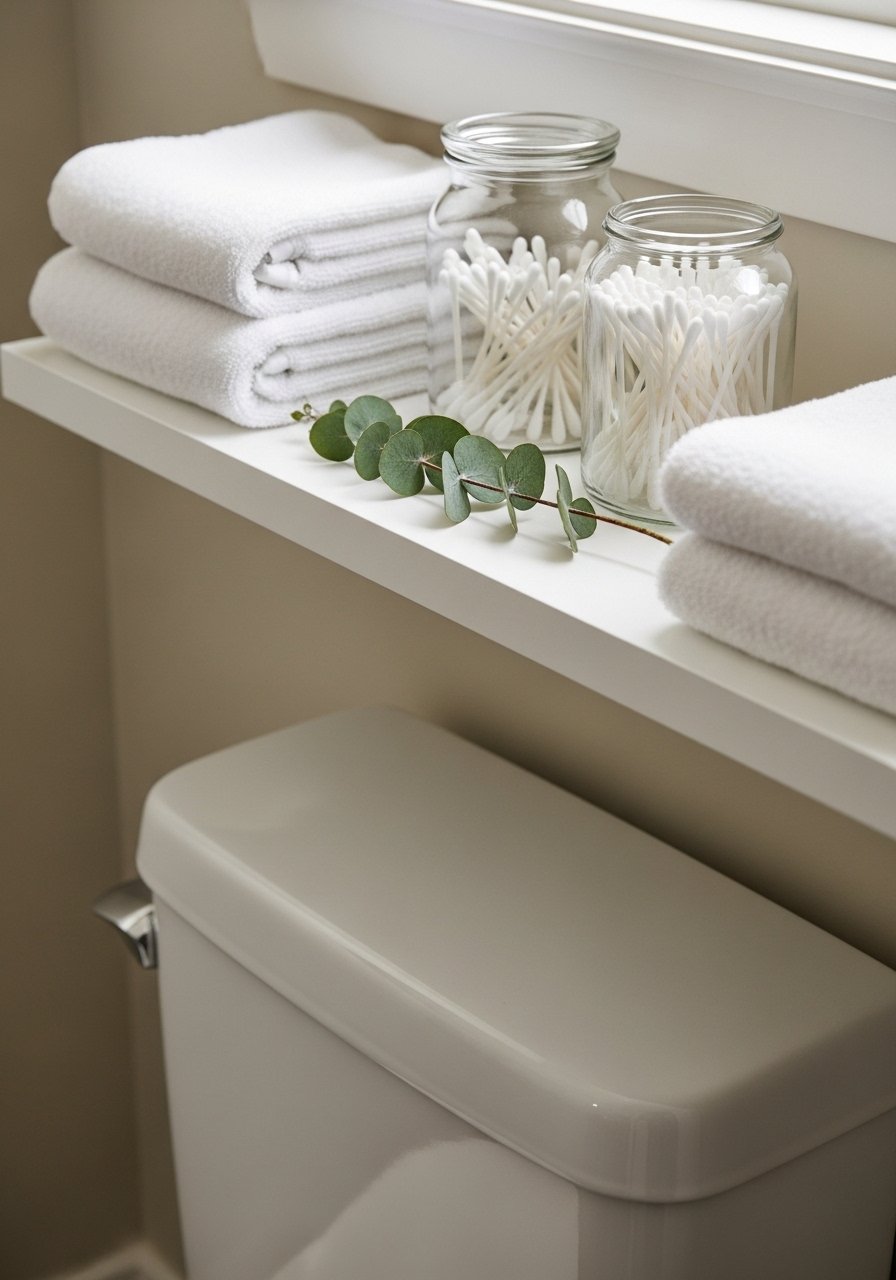
5. Open Cubby Shelves to Display Towels and Jars
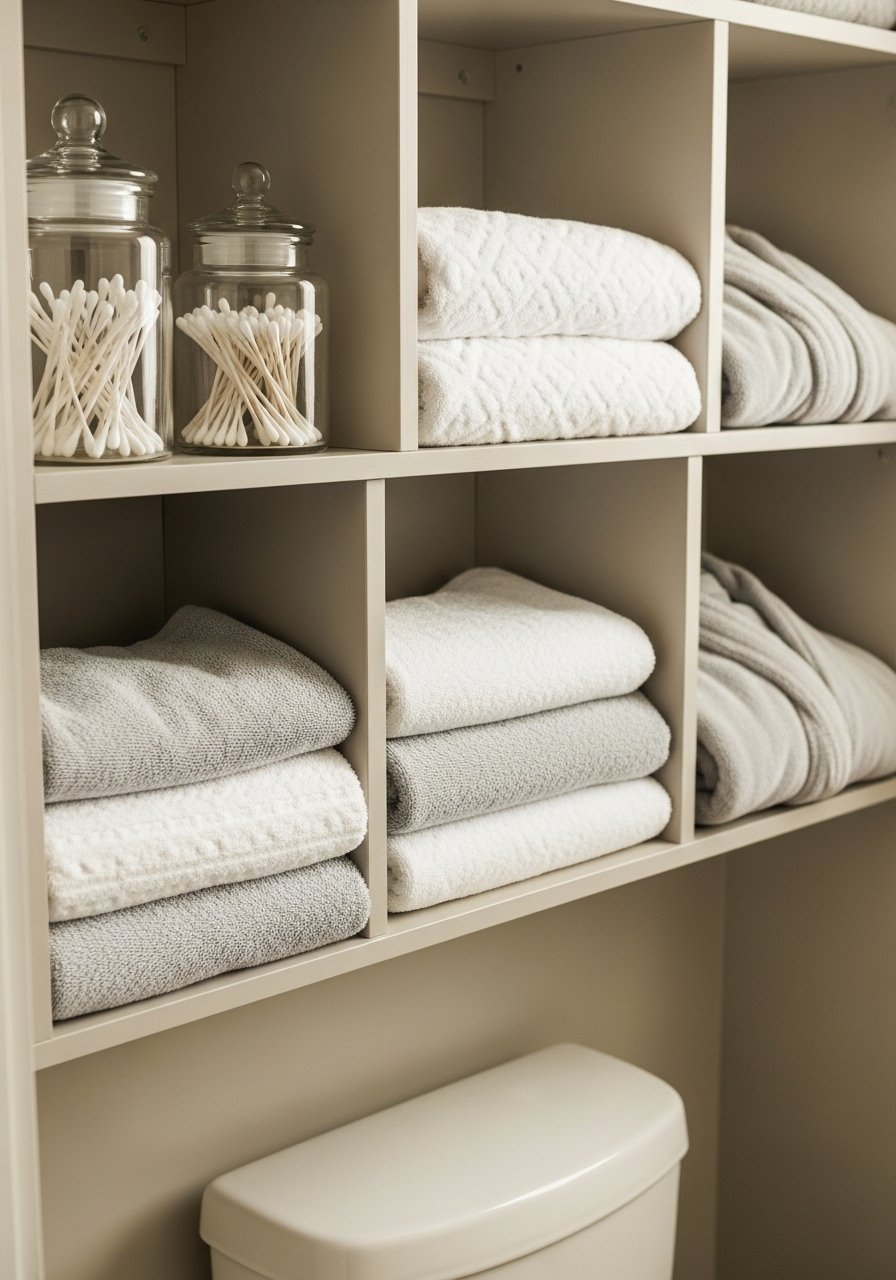
Open cubbies make the space feel curated. I stacked towels, added apothecary jars, and a small tray for perfumes. It looks like a boutique shelf but works in a real home.
My early attempt used too many decorative items. The cubbies felt cluttered. I pared back to 3–4 essentials per cubby. That tiny edit changed the whole look.
What You’ll Need for This Look
6. Floating Cabinet with Hidden Outlets for Nightlight
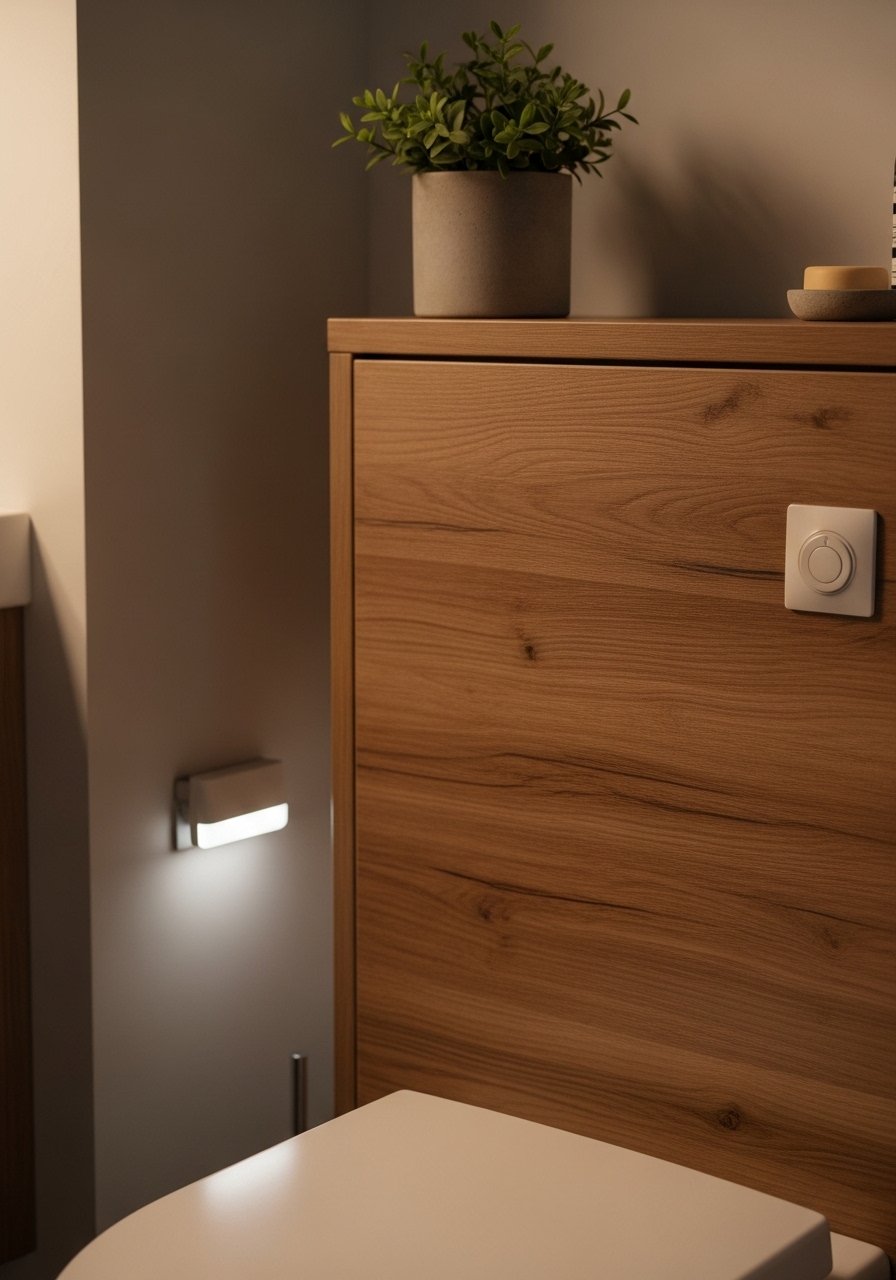
I added a floating cabinet and routed an outlet inside it for a plug-in nightlight. The glow is subtle and keeps midnight trips safe without bright overheads. The cabinet keeps chargers and a diffuser out of sight.
I accidentally bought one without predrilled access for wiring. Lesson learned: measure and ask if there’s a wiring channel. It saved me an electrician call later.
What You’ll Need for This Look
7. Tall Metal Shelving Unit for Industrial Flair

In a rental, I used a tall metal shelving unit leaned against the wall. It felt sturdy and gave me three full shelves for towels, tools, and decor. The black frame makes the bathroom feel grounded.
I learned to measure the clearance from the tank; some units are too deep. Choose an industrial unit with a slim profile to avoid bumping the tank.
What You’ll Need for This Look
8. Built-In Niche With Open Shelving (DIY)
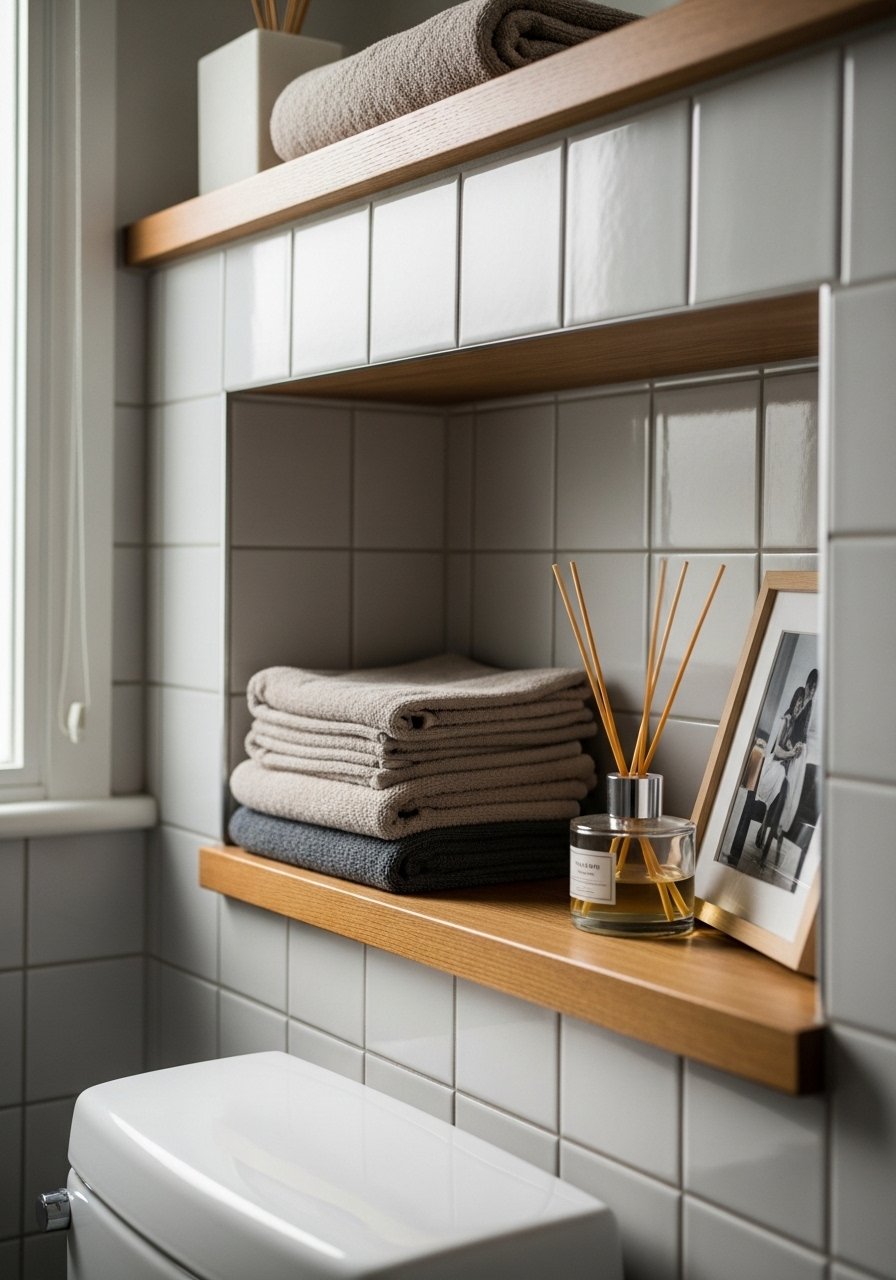
When we remodeled, I carved a shallow niche into the wall above the toilet and fitted two wood shelves. It looks custom and costs less than a full cabinet. The niche gives the wall a real purpose.
My screw-up was making it too shallow; I couldn’t fit jars. Aim for at least 6–8” depth and line it with tile for a finished look.
What You’ll Need for This Look
9. Mirrored Medicine Cabinet That Doubles as Storage

I swapped a plain mirror for a recessed mirrored medicine cabinet. It gave me hidden space for skincare and meds, while keeping the reflection to open the room. It was a tidy upgrade.
The catch: some mirrored cabinets are shallow. I traded one back for a deeper model. Measure your toiletries before you buy.
What You’ll Need for This Look
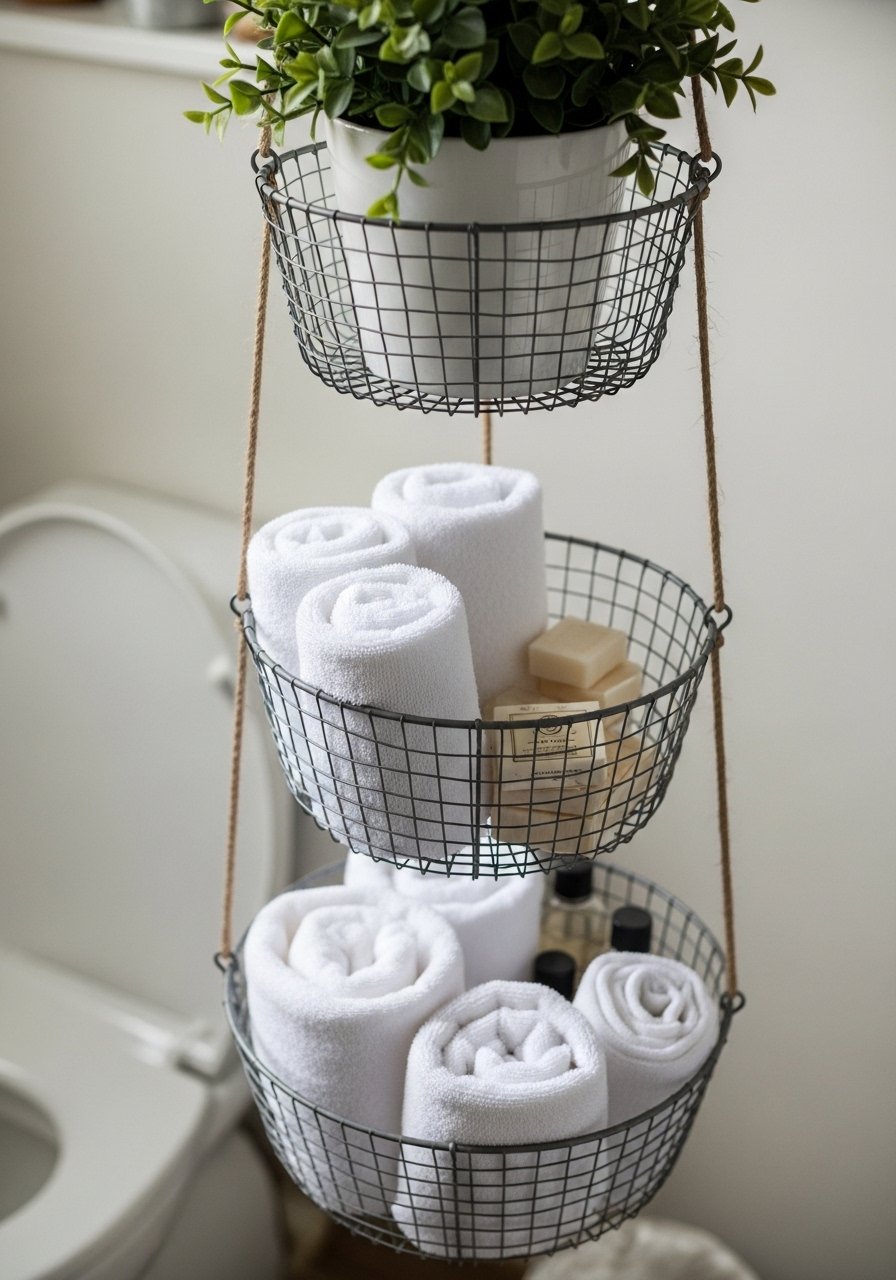
10. Hanging Basket Rail for Towels and Small Items
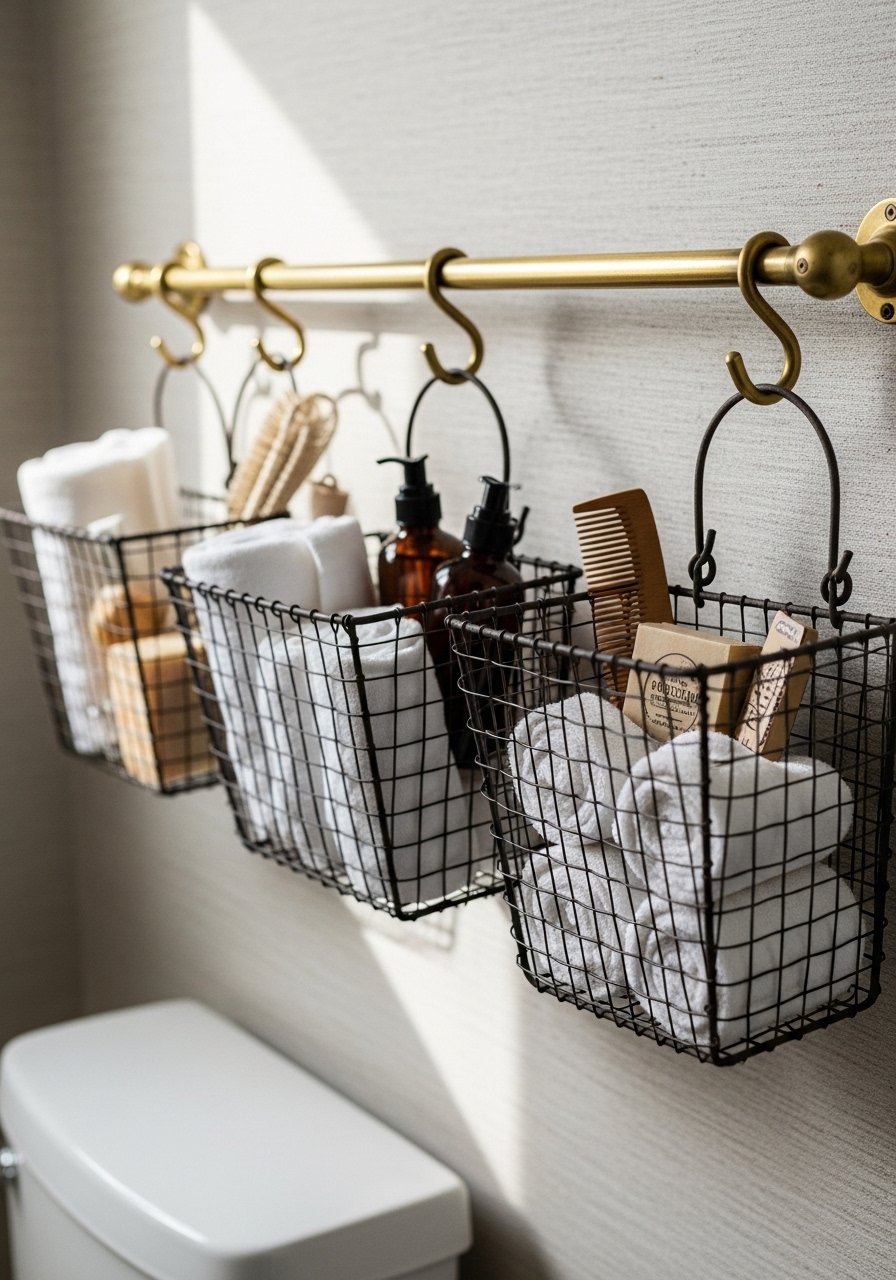
I installed a simple rail and hung 2–3 wire baskets. It’s inexpensive and makes use of vertical space without permanent bulky furniture. I keep spare soaps and washcloths there.
I initially bought flimsy hooks and baskets sagged. Choose metal hooks and baskets with solid rims. The rail should sit high enough not to bump your head.
What You’ll Need for This Look
11. Over-the-Toilet Unit with Drawers for Small Bathrooms
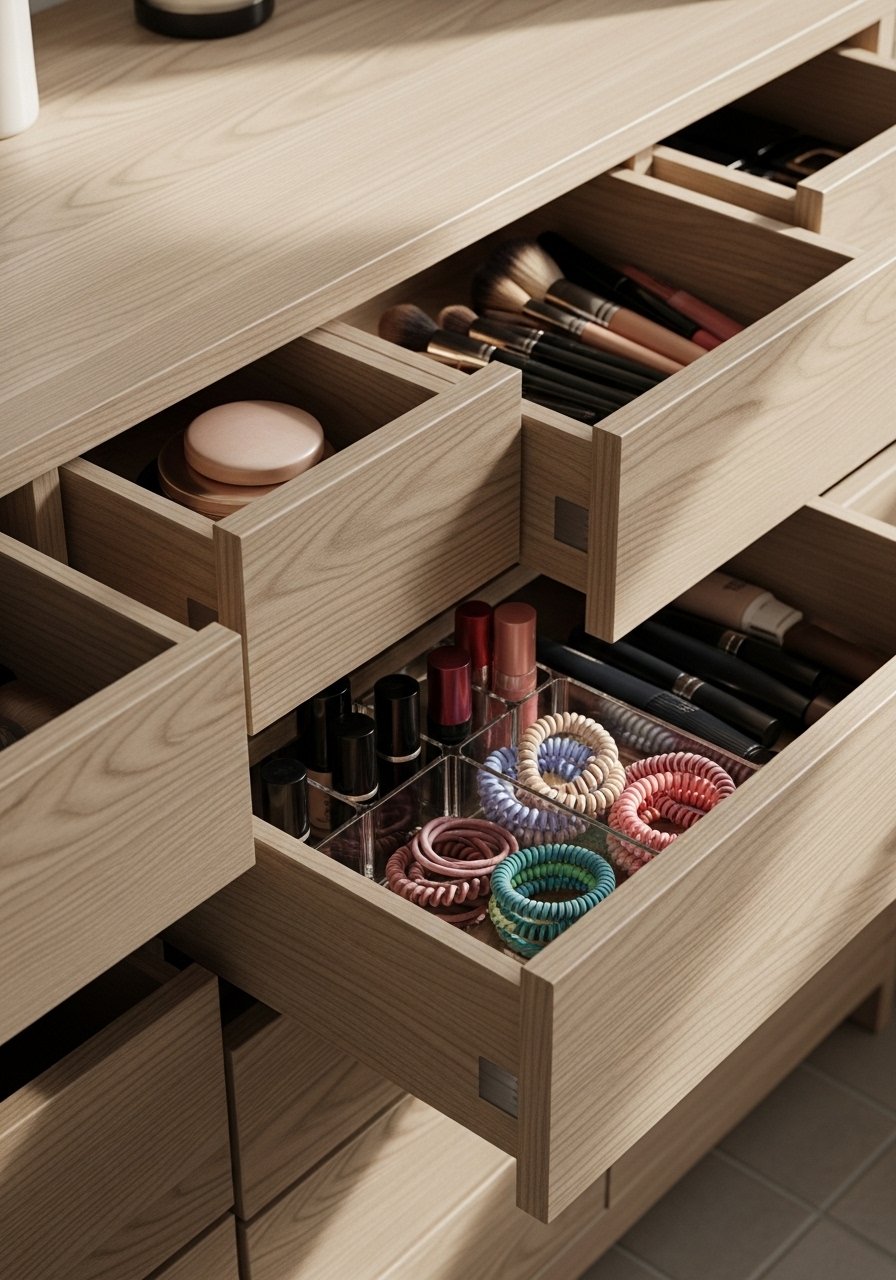
If you want hidden zones for hair ties and makeup, go for an over-the-toilet unit with shallow drawers. I keep a drawer for meds and one for styling tools. It reduces visual clutter.
I ordered one with cheap drawer runners once. Drawers stuck. Look for soft-close or metal runners — they last and feel nicer every day.
What You’ll Need for This Look
12. Shelf with Integrated Hooks for Robes and Towels
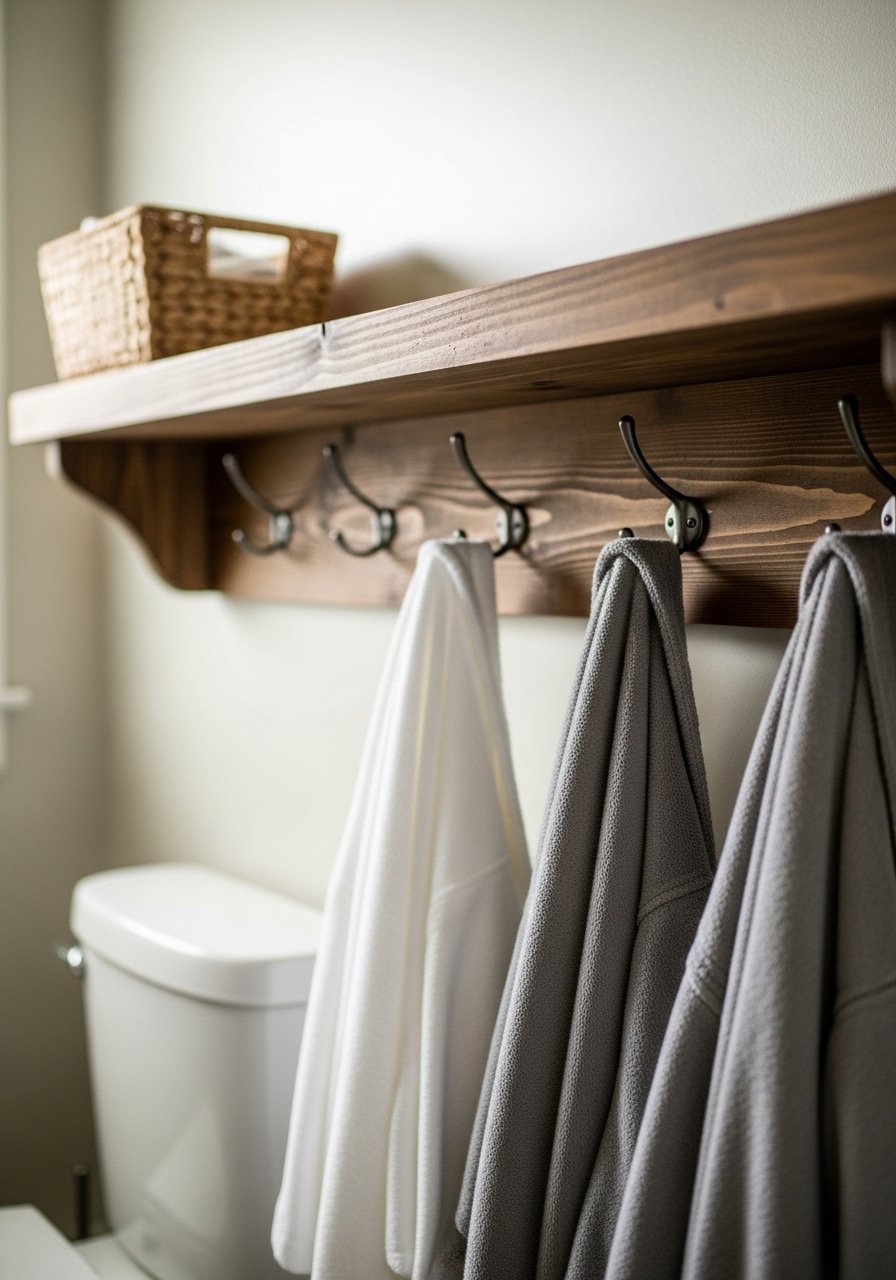
A shelf with integrated hooks solved the “where to hang the robe” problem. Hooks below take towels and robes. The shelf above stores a basket and a candle. It’s compact and multifunctional.
I mistakenly put hooks too far apart once and the robe slipped. Measure your hook spacing based on what you’ll hang. Place the shelf high enough to clear the toilet tank.
What You’ll Need for This Look
13. Reclaimed Crate Shelves for a Thrifted Look
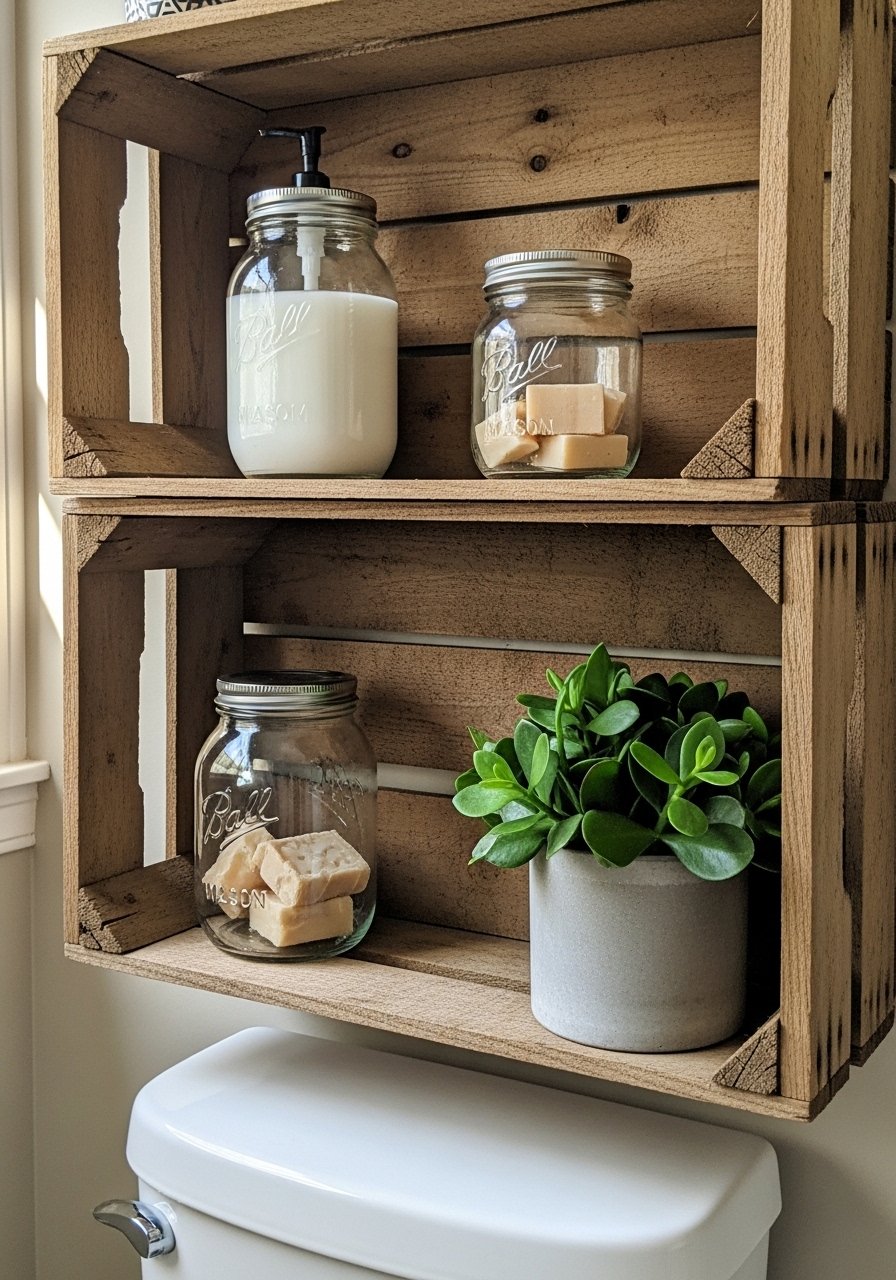
I scavenged reclaimed crates to make shelves. They add texture and a casual vibe. Crates are great for baskets and small jars and give the space personality.
I didn’t sand the edges enough at first and got splinters. A light sanding and a protective finish made them feel intentional and safe in a bathroom.
What You’ll Need for This Look
14. Slim Rolling Cart Tucked Next to Toilet
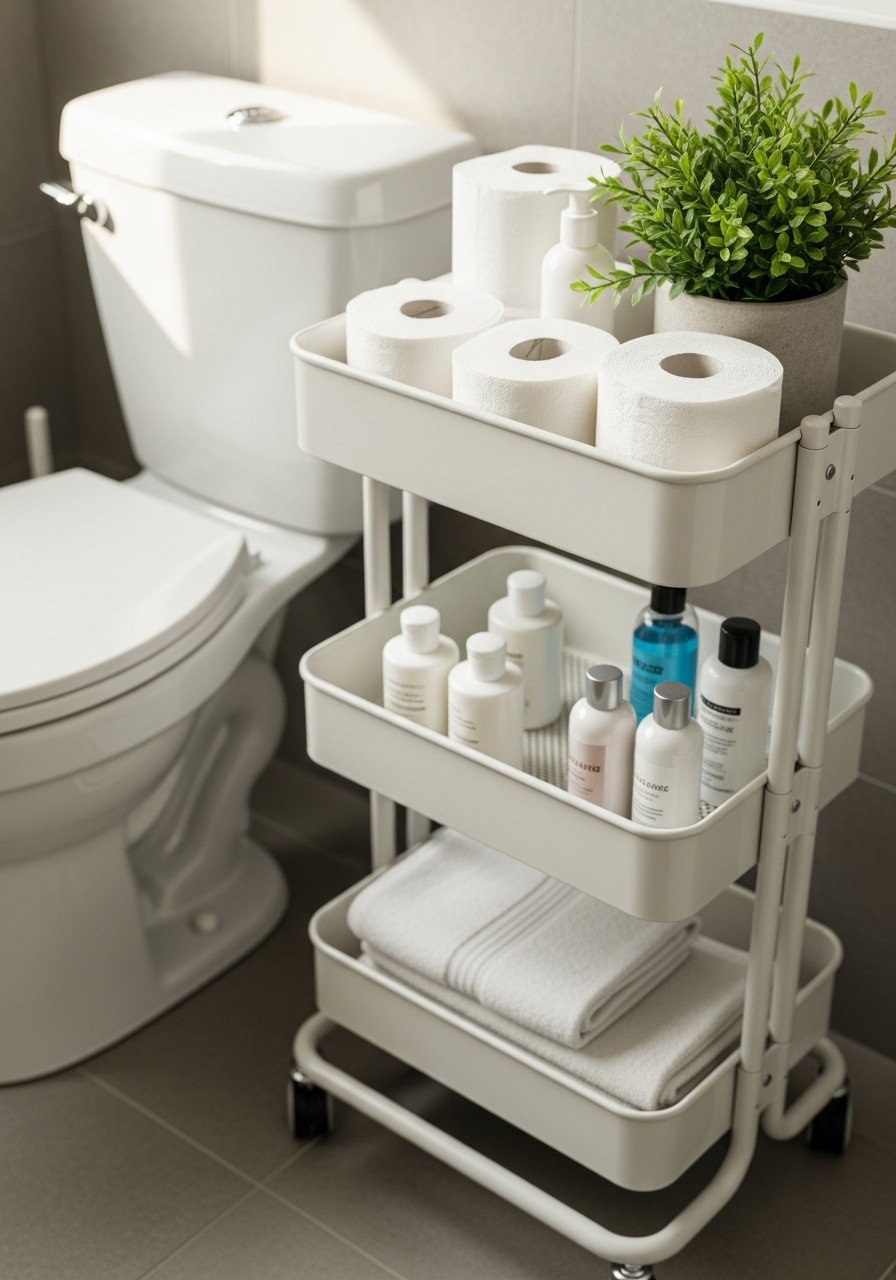
A slim rolling cart is perfect when you can’t drill. I used one for extra rolls, cleaners, and a diffuser. Wheels mean I can pull it out to clean, then tuck it back.
The mistake was not locking the wheels. Get casters with locks so it doesn’t drift. Also measure the gap so it can slide in without scraping the tank.
What You’ll Need for This Look
15. Framed Cubby Display With Small Art and Plants

I turned a shallow frame into a single cubby for a small vase, a photo, and a plant. It reads like art and adds a layered moment to the wall without bulk.
Be careful with water on plants — my first succulent left a ring on the shelf. Use a saucer or artificial plants if you forget to water.
What You’ll Need for This Look
16. Pegboard Organizer for Changing Storage Needs
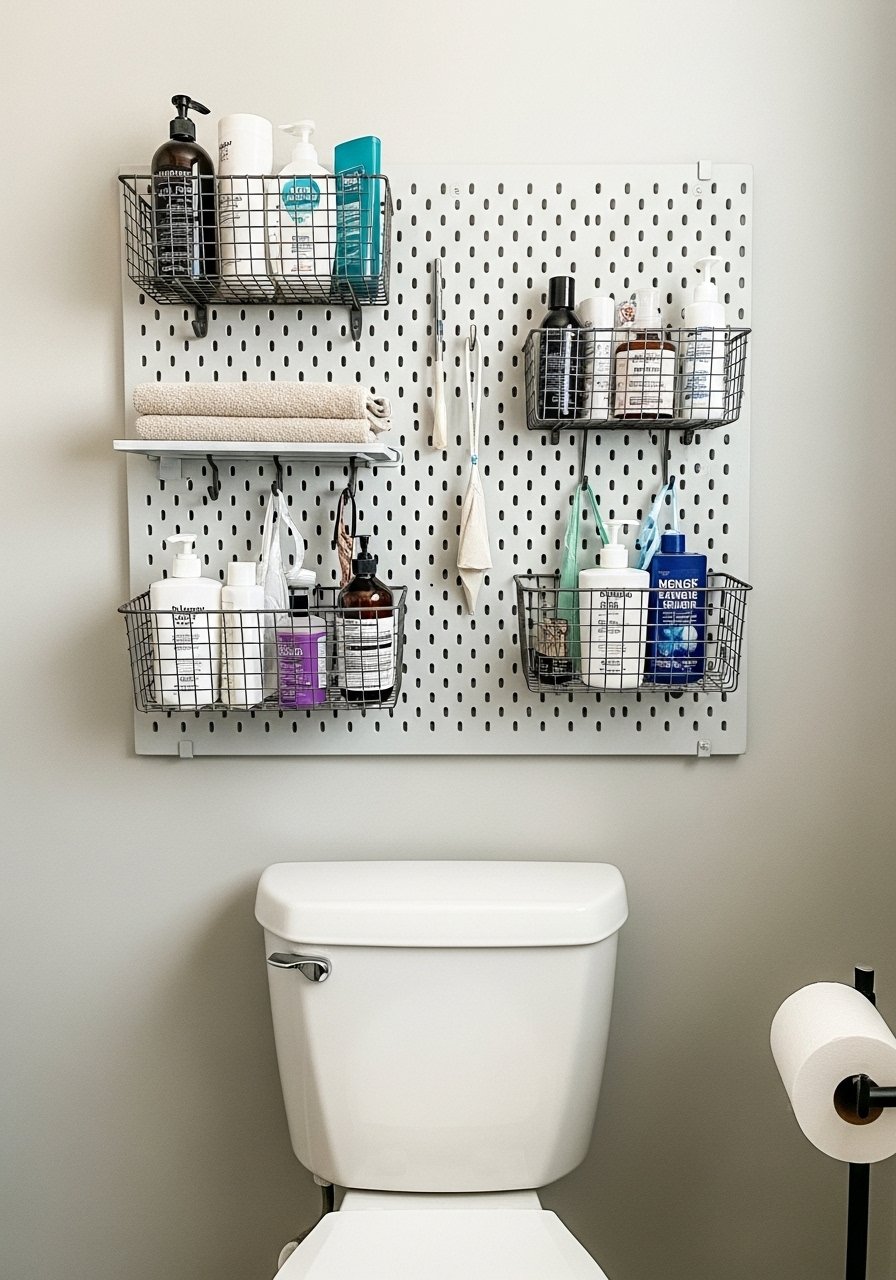
I installed a pegboard and rearranged hooks and small shelves every season. It’s ideal if your storage needs change — you can add baskets, hooks, or a little shelf where you need it.
My pegboard was too small at first. Go big enough to balance the toilet visually. Paint it to match or contrast for style.
What You’ll Need for This Look
17. Mirrored Shelf With Built-In Lighting
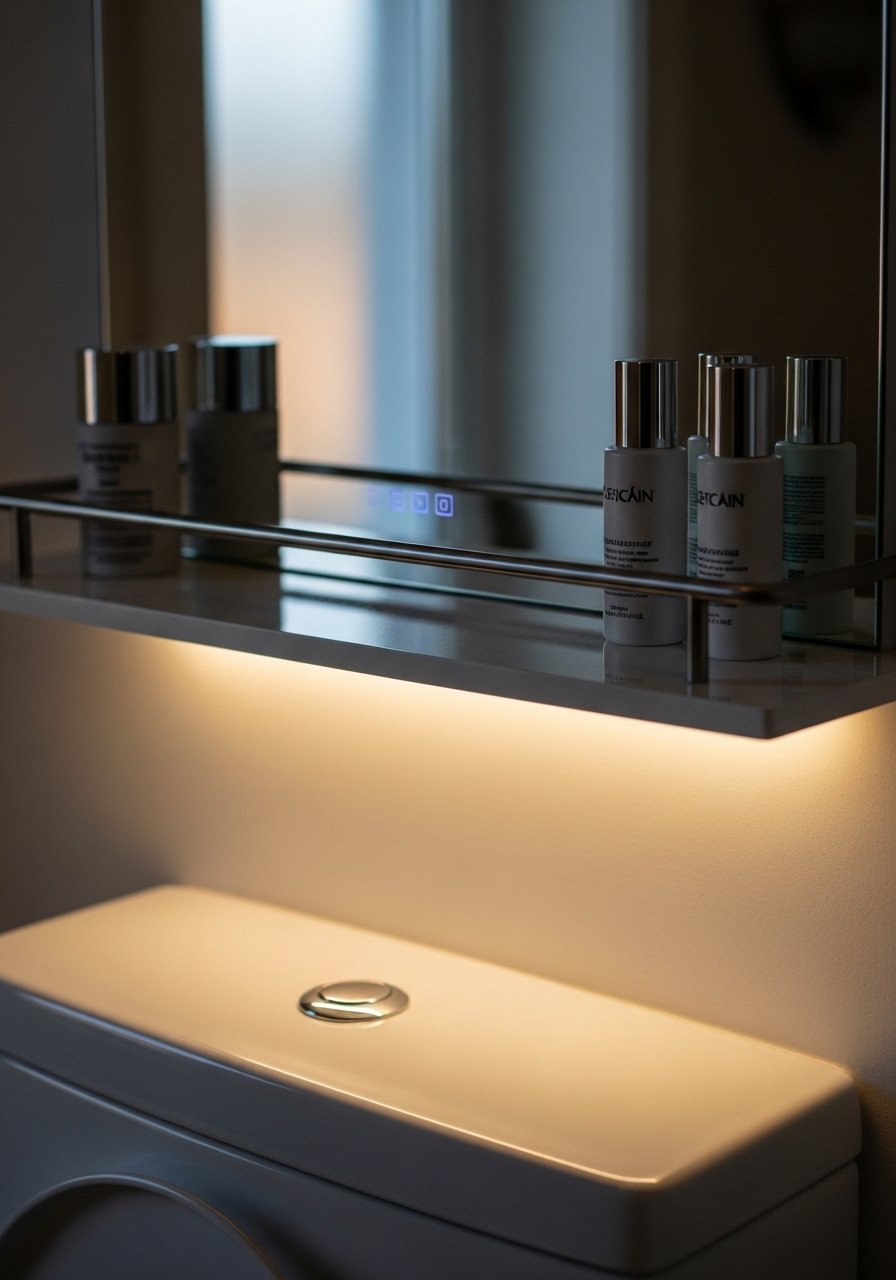
A mirrored shelf with an LED strip solved two things: reflection to open the room and soft light for nighttime. I keep skincare and a candle on the shelf. It feels tidy and calm.
I once chose cold LEDs and regretted it. Go for warm light (2700–3000K) — it reads better on skin and makes the bathroom feel cozy.
What You’ll Need for This Look
18. Narrow Bookcase Repurposed for Linens
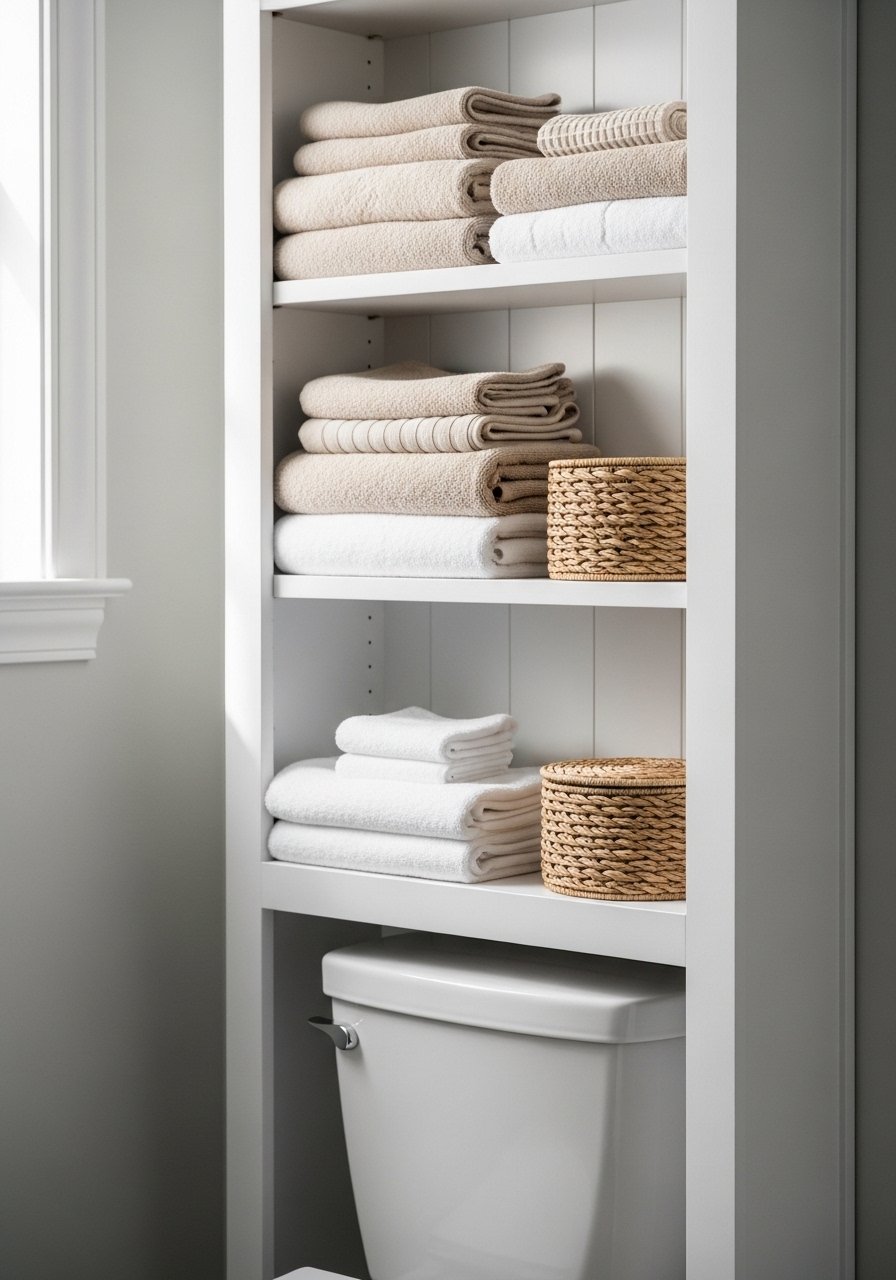
I repurposed a narrow bookcase as over-the-toilet storage. It holds towels and a basket of toiletries. Paint it to match your trim and it reads as built-in.
I learned to secure it to the wall. Unsecured bookcases wobble and it’s not worth the risk. Use brackets or anti-tip straps.
What You’ll Need for This Look
19. Painted Cabinet to Match Trim for Seamless Look
I painted an off-the-shelf cabinet the same color as my trim. Suddenly it didn’t look like an add-on. It disappeared into the room and felt custom.
My tip: use a primer and satin finish for durability in the bathroom. Avoid super glossy paints that show every fingerprint.
What You’ll Need for This Look
20. Wire Tiered Baskets for a Farmhouse Touch
Wire tiered baskets bring a farm-style practicality. I use them for extra soap, small hand towels, and a little greenery. They’re light and make everything easy to reach.
I once hung them too low and bumped my head. Keep them high enough to clear the tank and choose baskets with closed bottoms for small items.
What You’ll Need for This Look
21. Shelf with Decorative Doors for Style and Storage
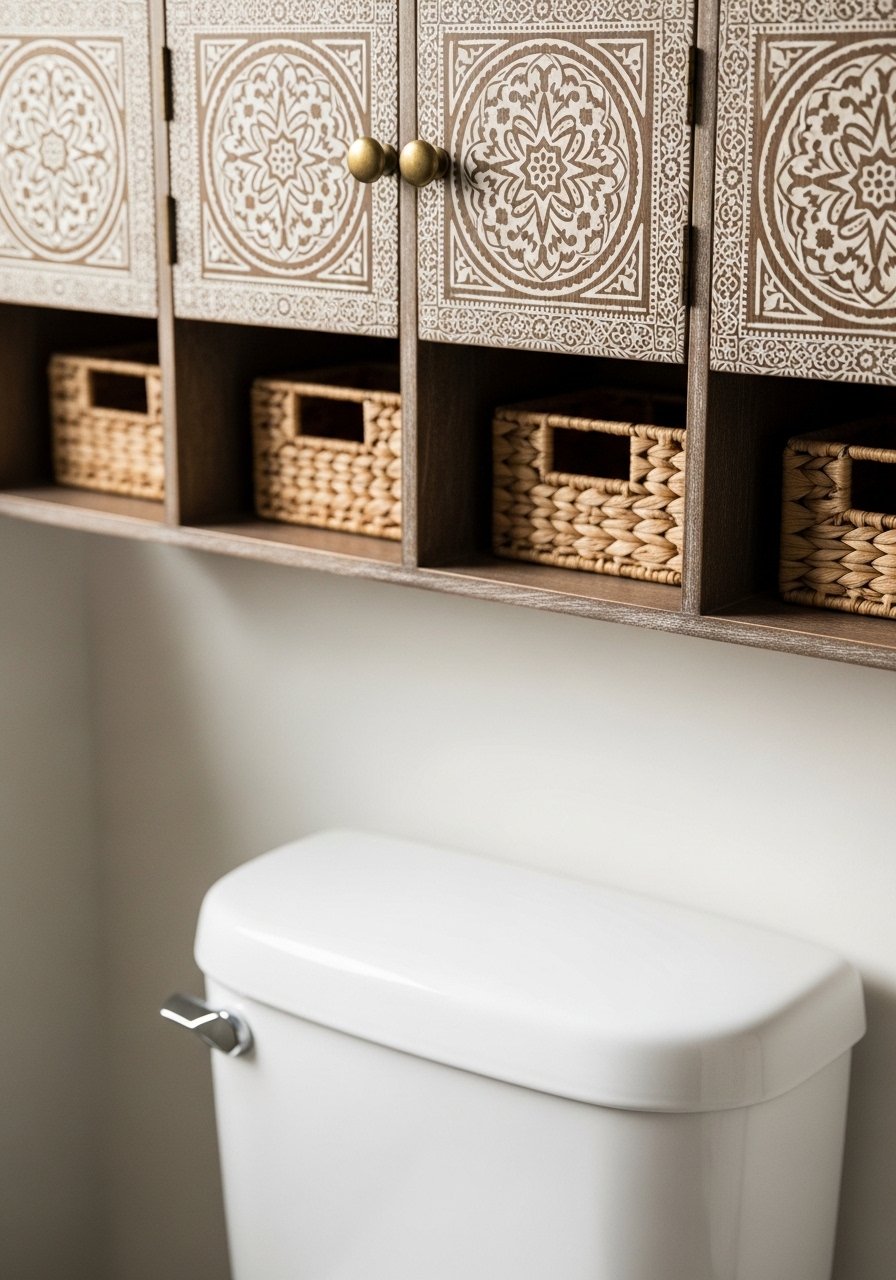
I bought a shelf with small decorative doors so I could hide the ugly bits and still have a styled surface. The doors add personality and keep toiletries private.
I learned to check hinge quality. Cheap hinges sag. Upgrade to solid hardware if the doors feel flimsy.
What You’ll Need for This Look
22. Plant Ladder Shelf to Add Greenery and Softness
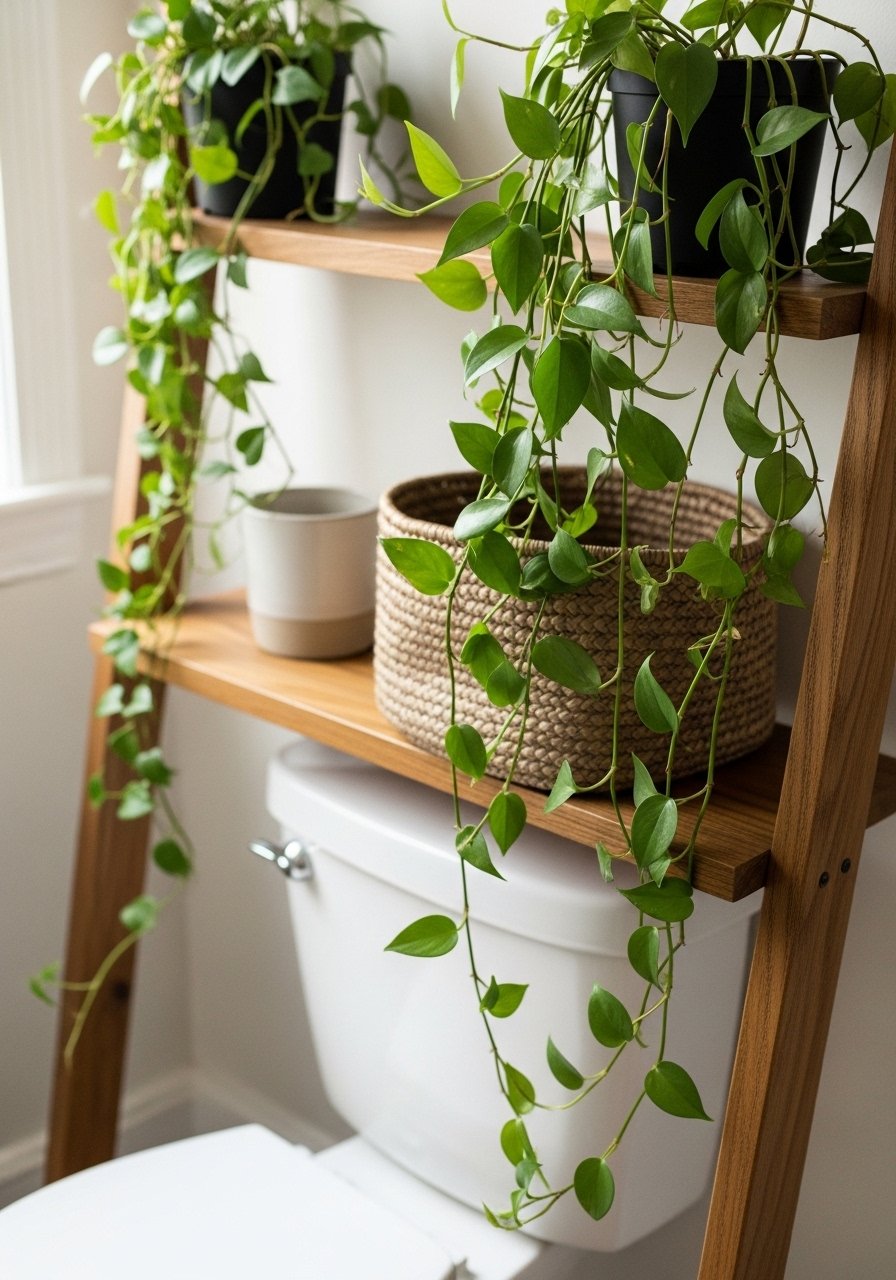
Plants make any small bathroom breathe. I used a ladder-style shelf specifically for plants — trailing pothos and a fern that thrives in humidity. It softens the space and adds color.
I overwatered once and learned to use saucers. Pick plants that like humidity and put plastic liners under pots to protect the shelf.
What You’ll Need for This Look
Final Thoughts
You don’t have to use every idea here. Pick one or two that match your routine and space. I found small changes add up to a calmer bathroom.
Measure, think about how you use the room, and plan for durability. Then install and live with it — you’ll know what to tweak next.
Leave a Reply